Introduction
Blender is a powerful tool for 3D modeling, animation, and rigging, widely used by professionals and hobbyists alike. One of the key challenges when rigging characters in Blender is skinning—the process of binding a 3D mesh to a skeleton so it deforms correctly. Traditional skinning methods can result in unnatural deformations, particularly when a model moves or stretches. This is where Blender volume preserving skinning comes into play.
Volume preserving skinning is an advanced technique that aims to maintain the volume of a mesh as it deforms. This technique is particularly useful for organic models, like characters, where you want to preserve the shape and integrity of the mesh, especially in areas like the face, joints, and muscles. In this article, we’ll walk you through how to use Blender’s volume preserving skinning method to achieve smooth, realistic deformations that enhance your models' animation.
What is Volume Preserving Skinning?
Volume preserving skinning is a method that focuses on preserving the volume of a mesh during deformation, rather than allowing parts of the model to shrink or stretch unnaturally. Traditional skinning techniques—such as linear blend skinning—can result in undesirable changes to the model’s volume as it moves. This is often referred to as “candy wrapper” effects, where certain parts of the mesh may get stretched or compressed in unrealistic ways.
The main goal of volume preserving skinning is to ensure that the mesh maintains its shape while still allowing for natural, flexible movement. This is especially important in character animation, where the volume of muscles and joints must remain consistent for a believable, lifelike effect.
Why Use Volume Preserving Skinning in Blender?
When working with 3D models, maintaining volume during deformation is crucial for realistic animation. Without volume preservation, a character might appear distorted or inauthentic, especially during complex movements. For example, in a character’s arm, you wouldn’t want the muscle mass to shrink unnaturally when the arm bends. Volume preserving skinning solves this problem by maintaining the model's volume and creating more fluid and natural movements.
Some of the primary benefits of using volume preserving skinning in Blender include:
- Realistic deformations: Preserves the natural shape of muscles, joints, and other soft tissues.
- Increased flexibility: Allows for more dynamic and detailed animations without worrying about the integrity of the mesh.
- Improved realism: Ensures that the volume doesn’t shrink or stretch unexpectedly, leading to more believable characters in motion.

How to Use Blender Volume Preserving Skinning
Step 1: Set Up Your Blender Scene
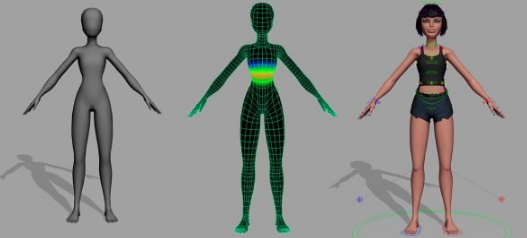
Before diving into volume preserving skinning, ensure that your character mesh and armature (skeleton) are set up correctly in Blender. You will need:
- A completed character model (rigged with bones)
- A properly created skeleton (armature)
- Weight painting (assigning how much influence each bone has over the mesh)
Ensure that your model is ready for rigging by checking that the topology supports deformation, especially in areas like the elbows, knees, and shoulders.
Step 2: Enable Volume Preserving Skinning
To use volume preserving skinning in Blender, you will typically rely on a special type of modifier or deforming tool that is available in Blender's advanced rigging options. The most common method to achieve this effect is by using dual quaternion skinning.
Here’s how you can enable it:
- Select your armature (skeleton) in the 3D view.
- Go to the Properties panel and find the Armature modifier.
- Under the modifier settings, find the Deform section and select Dual Quaternion under the “Skinning” type.
Dual quaternion skinning helps preserve the volume by interpolating the rotations in a way that minimizes mesh deformation. It’s a very effective technique for creating realistic deformations in a character’s limbs and joints.
Step 3: Fine-Tune the Weight Painting
Weight painting is an essential part of the rigging process in Blender, and it plays a crucial role in ensuring volume preservation. By adjusting the weight values, you can control how much influence each bone has on the mesh.
- Select the mesh and go into Weight Paint Mode.
- Paint the weight values so that bones near joints (like elbows and knees) have more influence, while other parts of the model have less.
- Use smooth strokes and adjust weights for a smoother transition between bones to avoid harsh deformations.
Step 4: Test and Refine the Deformations
Once you’ve applied volume preserving skinning and adjusted your weight painting, it's time to test your model’s deformations. Move the bones to simulate how the model will deform during animation.
- If areas of your model are still stretching or compressing unnaturally, you can adjust the weights or add corrective shape keys.
- Use the Pose Mode to test various positions and refine your model’s deformations by fine-tuning the skinning parameters.
Tips for Better Volume Preserving Skinning
- Use corrective shape keys: If certain areas of your mesh still deform unnaturally, use shape keys to correct the mesh’s shape during specific poses.
- Combine dual quaternion with regular skinning: For certain situations, you may want to combine volume preserving skinning with other skinning techniques for optimal results.
- Check for stretching: Always check areas like the armpits and knees for unnatural stretching. These areas are prone to deformation, so use additional weight painting to correct them.
FAQ Section
1. What is the difference between dual quaternion skinning and traditional skinning?
Dual quaternion skinning offers a more advanced interpolation of rotations, maintaining volume during deformations, while traditional linear blend skinning can cause undesirable shrinking or stretching of the mesh.
2. Can I use volume preserving skinning for hard-surface models?
Volume preserving skinning is typically used for organic models, but it can also help in some cases for hard-surface models that require flexible deformations.
3. How do I fix “candy wrapper” effects in Blender?
To avoid candy wrapper effects, use dual quaternion skinning and refine your weight painting to reduce stretching or shrinking during movement.
4. Is volume preserving skinning difficult to master?
It can be challenging, especially for beginners, but with practice, you can master it. Focus on understanding weight painting and experimenting with different rigging techniques.
5. Can volume preserving skinning be used for facial animations?
Yes, it’s highly effective for facial rigging, where volume changes are crucial to maintaining realistic expressions.
6. Are there any Blender add-ons for skinning?
Yes, there are several Blender add-ons that enhance skinning and rigging capabilities, such as Rigify and Auto-Rig Pro, which support advanced skinning features.
Conclusion
Blender’s volume preserving skinning method is a game-changer for 3D artists and animators seeking to create realistic character animations. By preserving the volume of your mesh during deformations, you can ensure smoother, more believable animations. Whether you're working on a game, movie, or animation, this technique can elevate the quality of your work and streamline your rigging process. Remember, practice makes perfect, so take the time to refine your skills and test different settings for optimal results.